
Lesson guide
Learning objectives
- Explain the main purpose of Form properties and methods in JavaScript.
- Identify the syntax, APIs, or concepts introduced in this lesson.
- Use the examples to predict how JavaScript will behave before you run similar code.
- Connect this topic to nearby lessons in Forms, controls.
Real-world context
This lesson matters when you need to recognize where Form properties and methods fits into real JavaScript programs. Forms and control elements, such as have a lot of special properties and events.
Key ideas
- Form properties and methods is part of the Forms, controls chapter, so it builds on the surrounding concepts rather than standing alone.
- Read each code example in two passes: first for the result, then for the rule that explains the result.
- When a section compares similar features, focus on the condition that makes you choose one feature over another.
Key terms
- Form properties and methods
- Form
- properties
- methods
- Forms, controls
Forms and control elements, such as <input> have a lot of special properties and events.
Working with forms will be much more convenient when we learn them.
Navigation: form and elements
Document forms are members of the special collection document.forms.
That’s a so-called “named collection”: it’s both named and ordered. We can use both the name or the number in the document to get the form.
document.forms.my;
document.forms[0];
When we have a form, then any element is available in the named collection form.elements.
For instance:
<form name="my">
  <input name="one" value="1">
  <input name="two" value="2">
</form>

<script>
  // get the form
  let form = document.forms.my; // <form name="my"> element

  // get the element
  let elem = form.elements.one; // <input name="one"> element

  alert(elem.value); // 1
</script>
There may be multiple elements with the same name. This is typical with radio buttons and checkboxes.
In that case, form.elements[name] is a collection. For instance:
<form>
  <input type="radio" name="age" value="10">
  <input type="radio" name="age" value="20">
</form>

<script>
let form = document.forms[0];

let ageElems = form.elements.age;

alert(ageElems[0]); // [object HTMLInputElement]
</script>
These navigation properties do not depend on the tag structure. All control elements, no matter how deep they are in the form, are available in form.elements.
Fieldsets as “subforms”
A form may have one or many <fieldset> elements inside it. They also have elements property that lists form controls inside them.
For instance:
<body>
  <form id="form">
    <fieldset name="userFields">
      <legend>info</legend>
      <input name="login" type="text">
    </fieldset>
  </form>

  <script>
    alert(form.elements.login); // <input name="login">

    let fieldset = form.elements.userFields;
    alert(fieldset); // HTMLFieldSetElement

    // we can get the input by name both from the form and from the fieldset
    alert(fieldset.elements.login == form.elements.login); // true
  </script>
</body>
Shorter notation: form.name
There’s a shorter notation: we can access the element as form[index/name].
In other words, instead of form.elements.login we can write form.login.
That also works, but there’s a minor issue: if we access an element, and then change its name, then it is still available under the old name (as well as under the new one).
That’s easy to see in an example:
<form id="form">
  <input name="login">
</form>

<script>
  alert(form.elements.login == form.login); // true, the same <input>

  form.login.name = "username"; // change the name of the input

  // form.elements updated the name:
  alert(form.elements.login); // undefined
  alert(form.elements.username); // input

  // form allows both names: the new one and the old one
  alert(form.username == form.login); // true
</script>
That’s usually not a problem, however, because we rarely change names of form elements.
Backreference: element.form
For any element, the form is available as element.form. So a form references all elements, and elements reference the form.
Here’s the picture:
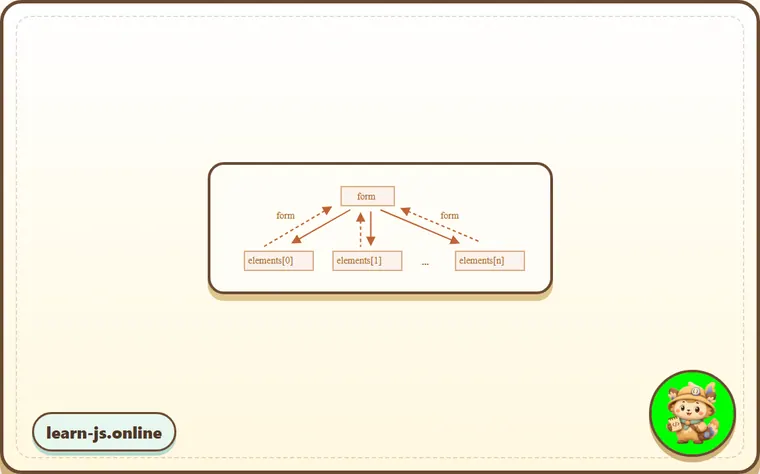
For instance:
<form id="form">
  <input type="text" name="login">
</form>

<script>
  // form -> element
  let login = form.login;

  // element -> form
  alert(login.form); // HTMLFormElement
</script>
Form elements
Let’s talk about form controls.
input and textarea
We can access their value as input.value (string) or input.checked (boolean) for checkboxes and radio buttons.
Like this:
input.value = "New value";
textarea.value = "New text";

input.checked = true; // for a checkbox or radio button
Use textarea.value, not textarea.innerHTML
Please note that even though <textarea>...</textarea> holds its value as nested HTML, we should never use textarea.innerHTML to access it.
It stores only the HTML that was initially on the page, not the current value.
select and option
A <select> element has 3 important properties:
select.options– the collection of<option>subelements,select.value– the value of the currently selected<option>,select.selectedIndex– the number of the currently selected<option>.
They provide three different ways of setting a value for a <select>:
- Find the corresponding
<option>element (e.g. amongselect.options) and set itsoption.selectedtotrue. - If we know a new value: set
select.valueto the new value. - If we know the new option number: set
select.selectedIndexto that number.
Here is an example of all three methods:
<select id="select">
  <option value="apple">Apple</option>
  <option value="pear">Pear</option>
  <option value="banana">Banana</option>
</select>

<script>
  // all three lines do the same thing
  select.options[2].selected = true;
  select.selectedIndex = 2;
  select.value = 'banana';
  // please note: options start from zero, so index 2 means the 3rd option.
</script>
Unlike most other controls, <select> allows to select multiple options at once if it has multiple attribute. This attribute is rarely used, though.
For multiple selected values, use the first way of setting values: add/remove the selected property from <option> subelements.
Here’s an example of how to get selected values from a multi-select:
<select id="select" multiple>
  <option value="blues" selected>Blues</option>
  <option value="rock" selected>Rock</option>
  <option value="classic">Classic</option>
</select>

<script>
  // get all selected values from multi-select
  let selected = Array.from(select.options)
    .filter(option => option.selected)
    .map(option => option.value);

  alert(selected); // blues,rock
</script>
The full specification of the <select> element is available in the specification https://html.spec.whatwg.org/multipage/forms.html#the-select-element.
new Option
In the specification there’s a nice short syntax to create an <option> element:
option = new Option(text, value, defaultSelected, selected);
This syntax is optional. We can use document.createElement('option') and set attributes manually. Still, it may be shorter, so here are the parameters:
text– the text inside the option,value– the option value,defaultSelected– iftrue, thenselectedHTML-attribute is created,selected– iftrue, then the option is selected.
The difference between defaultSelected and selected is that defaultSelected sets the HTML-attribute (that we can get using option.getAttribute('selected')), while selected sets whether the option is selected or not.
In practice, one should usually set both values to true or false. (Or, simply omit them; both default to false.)
For instance, here’s a new “unselected” option:
let option = new Option("Text", "value");
// creates <option value="value">Text</option>
The same option, but selected:
let option = new Option("Text", "value", true, true);
Option elements have properties:
option.selectedIs the option selected.option.indexThe number of the option among the others in its <select>.option.textText content of the option (seen by the visitor).
References
- Specification: https://html.spec.whatwg.org/multipage/forms.html.
Common mistakes
- Skipping the small examples and then missing the exact rule that Form properties and methods depends on.
- Copying code without changing one value at a time to see which part controls the result.
- Treating similar-looking syntax or APIs as interchangeable before checking their edge cases.
Summary
Form navigation:
document.formsA form is available as document.forms[name/index].form.elementsForm elements are available as form.elements[name/index], or can use just form[name/index]. The elements property also works for <fieldset>.element.formElements reference their form in the form property.
Value is available as input.value, textarea.value, select.value, etc. (For checkboxes and radio buttons, use input.checked to determine whether a value is selected.)
For <select>, one can also get the value by the index select.selectedIndex or through the options collection select.options.
These are the basics to start working with forms. We’ll meet many examples further in the tutorial.
In the next chapter we’ll cover focus and blur events that may occur on any element, but are mostly handled on forms.
Predict
Before running this forms check, predict the seven output lines. It models named form access, form.elements, radio groups, element.form, fieldset elements, select values, multi-select values, and new Option.
Reveal explanation
The output is same form:true, login:alice:my, age group:10|20, fieldset same:true, select:banana:2, multi:blues,rock, and option:Text:value:true:true. document.forms can be addressed by name or by index. A form exposes controls through form.elements, and controls link back through element.form. Repeated names, such as radio buttons, become a collection. Fieldset elements can expose a smaller elements collection while the form still reaches the same control. A select can be controlled by value or index, and multiple selected options must be collected from select.options. new Option(text, value, defaultSelected, selected) separates the initial selected attribute from the current selected state.
Try it
Set select.value = "pear" instead of "banana", then predict the select: line and which option becomes selected.
Practice
- Rewrite one example from this lesson without looking at the original, then run it and compare the result.
- Change one input, operator, method call, or option in a code sample and predict what will happen before running it.
- Explain Form properties and methods in your own words as if you were reviewing it with another learner.
Keep learning
Continue with Focusing: focus/blur when you are ready for the next lesson.